Composting with Worms by Layering the Worm Bedding
Composting With Worms: The Layering Method
Worm composting is the breaking down of organic materials
through microbial digestion in the worms gut.
In other words, worms eat the stuff we place in our compost beds, piles
and bins and then poop out nutrient rich compost which come out of the worm
ready for your garden.
In order to ensure the right environment for worms the needs
of the needs of the worms must be met. The
worm bedding must have a free flow of air.
If there isn’t enough air, and if there is too much water anaerobic
conditions will develop which will cause worms to die and bad microbes will
flourish. The outcome will be a
stinking, slimy mass of mess death.
One way to keep your worms healthy is to provide an aerobic
environment, which means providing the right amount of moisture and plenty of
air flow. The best way to create an
aerobic environment is through layering the organic materials that you wish to
compost. There are different worms for
different types of tasks. We are
primarily talking about Red wigglers, red worms, composting worms, Euroworms
and African Night Crawlers. They can all
be considered composting worms because they eat decaying food scraps and things
like newspaper and cardboard if prepared properly for entry into the worm
bed.
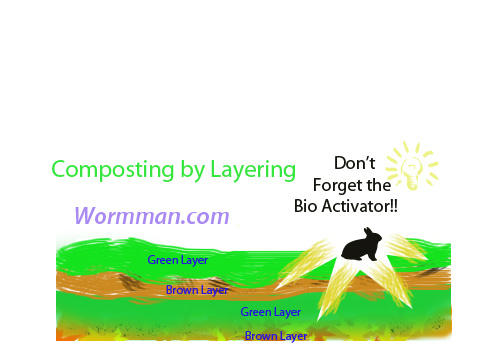
The best method is to provide the right amounts of organic
material, or food for your worms is to including layers of organic material. For this you will need brown and green
organic material.
·
Brown material is something like straw, shredded
newspaper, shredded cardboard, dried grass clippings, dried horse or cow
manure, or dried rabbit droppings.
·
Green material can be green grass clippings,
fresh green vegetable scraps and that sort of thing.
You will need a bio activator of some kind to get your
composting started. A bio activator can
be:
·
Fresh horse manure
·
Fresh Cow manure
·
Fresh rabbit manure
·
A handful of worm bedding/castings from an
existing, actively composting worm bed. (this will be full of the right microbes.)
You will layer the green and brown organic material by
alternating a brown layer with a green layer.
Moisten the layers with a spray of water. Use only enough to
wet the material but not enough to drench it.
Add your bio activator by inserting it so that some of the
compost activator touched every level by digging into the pile and inserting it
there.
Water again and wait.
Water daily if you are not getting rain but do not drench. Use just enough
water to ensure the pile stays damp.
After three or four days feel the top of the heap with your hand. It should be warm. The heat is caused by the decomposition of
the decaying organic matter.
As soon as the pile begins to heat and break down then you
have to use a spade or a hay fork and turn the pile. Have a hose nearby and lightly spray the pile
with each turn. Just mist the pile. Do not soak or this can disrupt the
process.
Turn and water your compost every other day until the
heating stops. You want to ensure that
every organic element is brought into the pile in order to come into contact
with the microbes that are making your compost.
When the heating stops you can add your worms. Waiting for the heating process to end is
very important because the composting organic material can get very hot and the
worms will try to escape the heat. They
will crawl off or they will die in the bed.
Once the heating stops, which should not be more than a
week, then you can add the worms. Place
them in the bed and give them a little water.
They will immediately escape the light and head into their new
home.
Water the worm beds when needed. You should not be able to squeeze more than a
couple of drops from the bedding. Any
more than that and it is too wet.
Turn your bedding daily in order to keep it fluffy and aerated.
When the bedding is filled with castings it is time to remove the worms to a
new home and then use the castings for what you want.
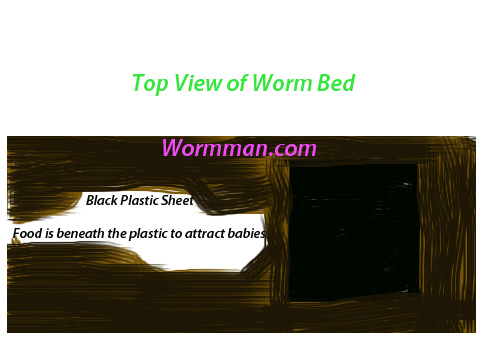
If you want to harvest babies then remove the adults to a
new bed after they have finished eating in their old home and let the capsules
hatch out baby worms. Feed the babies in
the old bin with aged manure or small amounts of fresh rabbit manure. Place the food on the top of the bin and
cover it with a sheet cut from black garbage bag. Use just enough plastic to only cover half of
the bin. The babies will mass under the
black plastic as they eat the food. You
can easily remove the babies and place them in their own bin to grow out into
breeders.
Use the worm castings in your garden and house plants in
place of chemical fertilizer.
Troubleshooting tips:
·
If the worm bedding smells then reduce the
amount of water and add more brown material.
Turn daily to help aerate.
·
If it the compost does not heat then add more
activator and a little more water. Add more green organic material like food
scraps.
·
If you notice bugs, besides your composting
worms, just leave them be. They are compost worm helpers and you need them in
your compost heap. If you have too many flies then make sure that you bury your
food scraps in the bedding. Flies should
not be a problem in a worm bed if the food scraps are properly buried.
·
Remember to start your worm bedding prior to
receiving your worms so that you can get the worm bed composting and past the
heating stage so that they worms will have a nice home when they arrive.
If you have any questions you can email me or
you can post them in our forum so that we all can share the knowledge. Wormman.com